

Table of Contents
Have you ever taken a bite of cake so fluffy and fragrant that it instantly felt like a warm hug? That’s exactly what this vanilla bean cake promises—a soft, bakery-style crumb infused with the rich aroma of real vanilla bean. Whether you’re planning a celebration or just craving something cozy and classic, this recipe delivers a beautifully simple dessert that feels anything but ordinary.
What makes it truly special is the use of vanilla bean paste, which gives the cake its signature speckled look and deep, authentic flavor. It’s the kind of treat that looks stunning on a dessert table but is easy enough to whip up on a lazy Sunday. Trust me—once you try it, you’ll never go back to boxed mixes again.
Key Benefits of This Vanilla Bean Cake
If you’re on the hunt for a dessert that’s equal parts elegant and comforting, this vanilla bean cake checks every box. It’s more than just a pretty slice—this cake delivers on flavor, texture, and versatility. Here’s why it deserves a spot in your baking rotation:
1. Pure, Authentic Vanilla Flavor
Unlike typical vanilla cakes that rely solely on extract, this recipe uses vanilla bean paste or fresh vanilla seeds. The result? A deeper, more aromatic flavor with those gorgeous vanilla flecks throughout the crumb.
2. Soft, Fluffy Texture Every Time
Thanks to a balanced combination of cake flour, butter, and buttermilk, you’ll get a light, airy crumb that feels like it came straight from a bakery. No dense or dry slices here—just pure fluff in every forkful.
3. Versatile for Any Occasion
From birthdays and baby showers to brunches or casual weekends, this cake fits right in. Dress it up with buttercream frosting, serve it naked with whipped cream and berries, or stack it into a layered showstopper.
4. Easy, Approachable Process
Even if you’re not a seasoned baker, this cake is completely doable. With straightforward steps and ingredients you likely have on hand, you’ll feel confident from mixing bowl to oven.
5. Customizable to Your Taste
Want to add a citrus twist? A swirl of jam? Or maybe go gluten-free? This recipe welcomes tweaks, making it perfect for adapting to your mood or pantry.
Ingredients for Vanilla Bean Cake Wonder
Before we dive into mixing and baking, let’s make sure you’ve got everything you need. This vanilla bean cake recipe calls for pantry staples, but what truly sets it apart is the use of real vanilla bean paste—it’s the secret to that rich, aromatic flavor and those signature speckles that make the crumb so stunning.
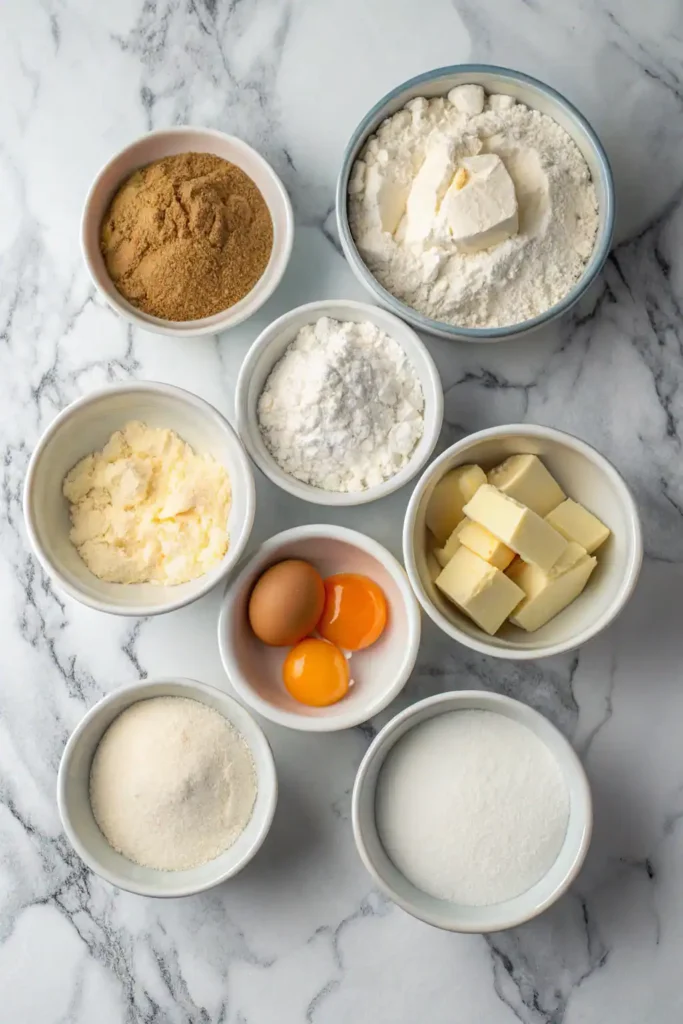
Here’s your ingredient checklist:
Dry Ingredients
- 2½ cups (285g) cake flour – For a tender, bakery-style crumb. You can substitute with all-purpose flour + cornstarch if needed.
- 2½ tsp baking powder – Helps the cake rise beautifully.
- ½ tsp fine sea salt – Balances sweetness and enhances vanilla flavor.
Wet Ingredients
- ¾ cup (170g) unsalted butter, softened – Room temperature is key for proper creaming.
- 1¾ cups (350g) granulated sugar – Adds sweetness and helps create a light texture.
- 4 large eggs, room temperature – Binds everything together and adds richness.
- 1 tbsp vanilla bean paste – The star of the show! You can substitute with the seeds from 1 vanilla bean or use high-quality vanilla extract in a pinch.
- 1 cup (240ml) buttermilk, room temperature – Keeps the cake ultra moist with a hint of tang.
Optional (But Recommended) Add-Ins:
- Zest of 1 lemon or orange – For a citrusy lift.
- ½ cup sour cream – For added moisture and depth.
- Buttercream or whipped cream frosting – To finish with flair.
Ingredient Tips & Swaps
- No buttermilk? Mix 1 cup whole milk with 1 tbsp white vinegar or lemon juice. Let it sit for 5 minutes before using.
- Want it dairy-free? Swap butter with vegan butter and use almond or oat milk + vinegar in place of buttermilk.
- Craving a flavor twist? Try adding a splash of almond extract or a swirl of raspberry preserves into the batter.
Instructions: How to Make This Vanilla Bean Cake Wonder
Ready to turn those simple ingredients into a stunning, fluffy masterpiece? These step-by-step instructions will walk you through the process with ease—whether you’re a weekend baker or just starting out. Let’s bake a vanilla bean cake that looks and tastes like it came from a boutique bakery!
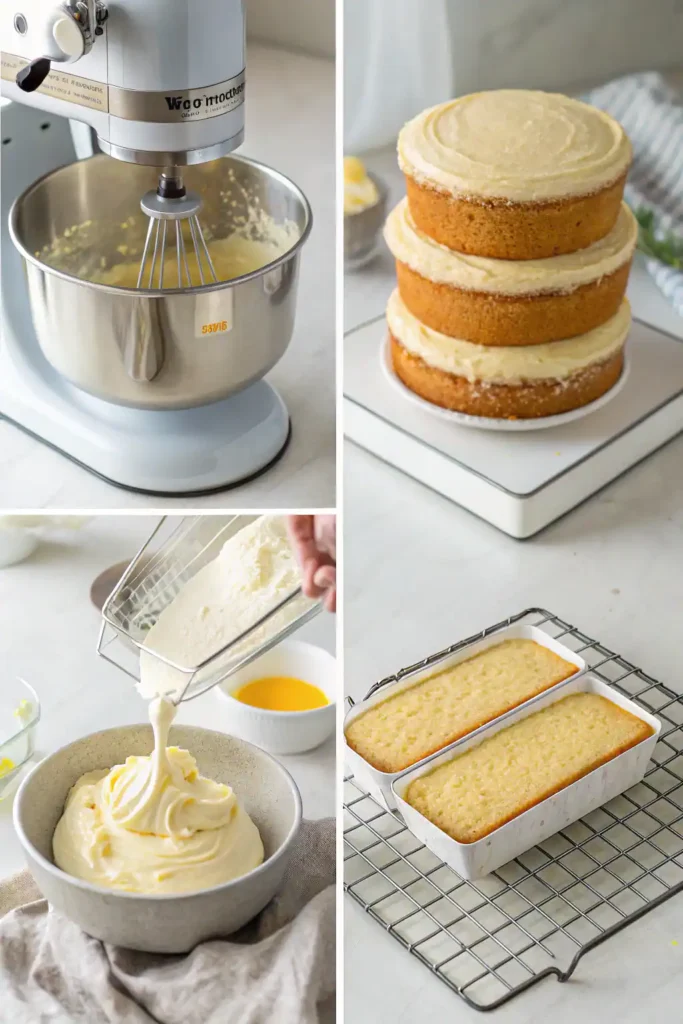
Step 1: Prep Your Equipment and Oven
- Preheat your oven to 350°F (175°C).
- Lightly grease and line two 9-inch round cake pans with parchment paper. This ensures easy release and beautiful, intact layers.
- If using a stand mixer, attach the paddle. If using a hand mixer, grab a large mixing bowl.
Step 2: Sift and Combine Dry Ingredients
- In a medium bowl, whisk together:
- Cake flour
- Baking powder
- Salt
- Cake flour
- Sifting helps avoid clumps and gives your cake that ultra-soft, fluffy texture.
Step 3: Cream Butter and Sugar Until Light and Fluffy
- In your mixer bowl, cream the softened butter and granulated sugar on medium-high speed for 3–4 minutes.
- You’re looking for a pale, airy mixture—this step adds volume and sets the stage for a light crumb.
Pro Tip: Scrape down the sides of the bowl a couple of times to make sure everything is evenly mixed.
Step 4: Add the Eggs and Vanilla Bean Paste
- Add the eggs one at a time, beating well after each addition.
- Stir in the vanilla bean paste—this is where the magic (and those beautiful vanilla specks) begins!
Step 5: Alternate Adding Dry Ingredients and Buttermilk
- Turn the mixer to low and add the flour mixture in three parts, alternating with the buttermilk in two parts.
- Start and end with the dry ingredients.
- Mix just until combined—don’t overmix!
- Start and end with the dry ingredients.
Pro Tip: Overmixing can lead to a dense cake. Stop once there are no visible streaks of flour.
Step 6: Pour, Tap, and Bake
- Divide the batter evenly between your prepared pans.
- Gently tap each pan on the counter to release any air bubbles.
- Bake for 28–32 minutes, or until a toothpick inserted in the center comes out clean.
Step 7: Cool Before Removing and Frosting
- Let the cakes cool in the pans for 10 minutes.
- Carefully turn them out onto a wire rack to cool completely before frosting or serving.
With the hard part done, you’re now ready to dress your cake up (or enjoy it as is!). That soft vanilla crumb and delicate flavor are a perfect canvas for your favorite toppings. Up next? Let’s chat about how to level up your cake with tips, variations, and serving inspiration.
Pro Tips and Variations for the Best Vanilla Bean Cake
Want to take your vanilla bean cake from great to absolutely unforgettable? These tried-and-true baking tips and creative variations will help you customize the recipe to suit your style, dietary needs, or simply what’s in your pantry.
Pro Tips for a Perfect Bake
- Use room temperature ingredients:
Cold eggs or butter can cause your batter to curdle or mix unevenly. Set your ingredients out 30–60 minutes before you begin. - Measure your flour the right way:
Spoon the flour into your measuring cup and level it with a knife—never scoop directly from the bag. This prevents dense, heavy cake. - Don’t skip the parchment paper:
It’s your best friend when it comes to ensuring your cake releases cleanly from the pan with no stuck edges or tears. - Test for doneness early:
Start checking your cake around the 28-minute mark. A clean toothpick and golden edges are your green lights. - Cool completely before frosting:
Even slightly warm cake layers can melt frosting into a slippery mess. Patience pays off!
Easy Variations to Try
Citrus Twist
Add 1 tablespoon of lemon or orange zest to the batter for a bright, refreshing layer of flavor. Perfect for spring gatherings!
Chocolate-Vanilla Marble
Before baking, swirl in ½ cup of melted dark chocolate or chocolate batter for a stunning marbled effect.
Berry-Filled Beauty
Gently fold in ½ cup of chopped strawberries or blueberries before baking, or layer the cake with fresh berries and whipped cream for a seasonal touch.
Cupcake Version
Divide the batter into a lined cupcake tin and bake at 350°F for 18–22 minutes. Great for parties or bake sales!
Gluten-Free Option
Use a 1:1 gluten-free flour blend made for baking. Add an extra egg or 2 tablespoons of sour cream to maintain moisture.
Serving Suggestions for Vanilla Bean Cake Wonder
Now that you’ve baked the most fluffy vanilla bean cake ever, it’s time to serve it in a way that truly highlights its delicate flavor and gorgeous crumb. Whether you’re going for something simple and elegant or fully dressed to impress, these ideas will help you present your cake like a pro.
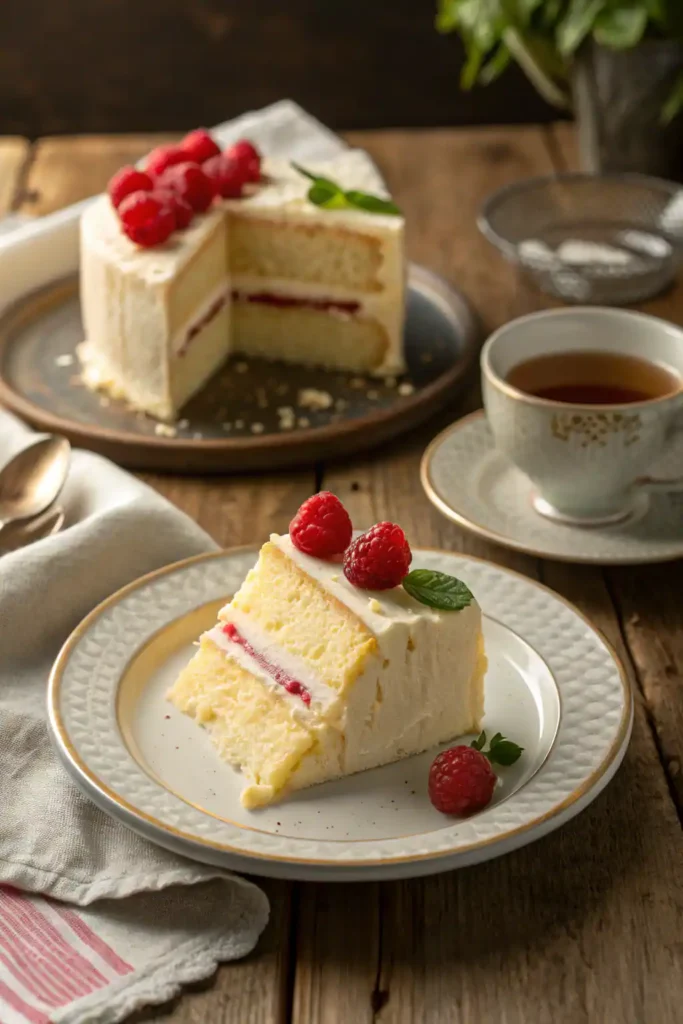
Everyday Elegance
- Serve as-is with a dusting of powdered sugar – Let the beauty of those vanilla bean flecks shine through.
- Add a dollop of whipped cream – Light, airy, and perfect for highlighting the soft vanilla notes.
- Pair with fresh berries – Strawberries, raspberries, or blueberries add a pop of color and a touch of tartness that balances the cake’s sweetness.
Decadent Dessert Vibes
- Top with vanilla bean ice cream – Double the vanilla, double the bliss.
- Drizzle with warm berry compote or caramel sauce – Adds moisture and flavor contrast for a more indulgent experience.
- Layer with cream cheese or buttercream frosting – For a bakery-style finish, especially for special occasions.
Perfect Pairings
- Coffee or espresso – The cake’s soft sweetness pairs beautifully with bold, roasted flavors.
- Chai latte or earl grey tea – Herbal and spiced notes complement the richness of the vanilla.
Make It Celebration-Ready
- Transform into a layer cake – Add a second layer with jam or lemon curd in the middle for an elegant twist.
- Decorate with edible flowers or gold dust – Stunning presentation without much effort.
- Use cookie cutters for mini cake shapes – Fun for showers, birthdays, or kid-friendly treats.
Why This Vanilla Bean Cake Belongs in Your Recipe Box
There’s just something magical about a vanilla bean cake done right. It’s simple but never boring, elegant without being fussy, and rich in flavor with every single bite. From its delicate crumb to the dreamy aroma of real vanilla, this cake delivers a wow-factor that’s as much about taste as it is about experience.
Whether you’re baking for a celebration or just because you’re craving something comforting and classic, this recipe is the kind you’ll come back to time and again. It’s easy to customize, fun to make, and always impresses—whether dressed up with layers of buttercream or served plain with a warm cup of tea.
At its core, this is more than a dessert—it’s a reminder that the most memorable cakes often come from simple ingredients, baked with care.
So, save this recipe, make it your own, and share it with someone you love. Because when it comes to homemade vanilla cake, joy is always baked right in.

Homemade Vanilla Bean Cake
Ingredients
Dry Ingredients
- 2½ cups 285g cake flour – For a tender, bakery-style crumb. You can substitute with all-purpose flour + cornstarch if needed.
- 2½ tsp baking powder – Helps the cake rise beautifully.
- ½ tsp fine sea salt – Balances sweetness and enhances vanilla flavor.
Wet Ingredients
- ¾ cup 170g unsalted butter, softened – Room temperature is key for proper creaming.
- 1¾ cups 350g granulated sugar – Adds sweetness and helps create a light texture.
- 4 large eggs room temperature – Binds everything together and adds richness.
- 1 tbsp vanilla bean paste – The star of the show! You can substitute with the seeds from 1 vanilla bean or use high-quality vanilla extract in a pinch.
- 1 cup 240ml buttermilk, room temperature – Keeps the cake ultra moist with a hint of tang.
Optional (But Recommended) Add-Ins:
- Zest of 1 lemon or orange – For a citrusy lift.
- ½ cup sour cream – For added moisture and depth.
- Buttercream or whipped cream frosting – To finish with flair.
Instructions
Step 1: Prep Your Equipment and Oven
- Preheat your oven to 350°F (175°C).
- Lightly grease and line two 9-inch round cake pans with parchment paper. This ensures easy release and beautiful, intact layers.
- If using a stand mixer, attach the paddle. If using a hand mixer, grab a large mixing bowl.
Step 2: Sift and Combine Dry Ingredients
- In a medium bowl, whisk together:
- Cake flour
- Baking powder
- Salt
- Sifting helps avoid clumps and gives your cake that ultra-soft, fluffy texture.
Step 3: Cream Butter and Sugar Until Light and Fluffy
- In your mixer bowl, cream the softened butter and granulated sugar on medium-high speed for 3–4 minutes.
- You’re looking for a pale, airy mixture—this step adds volume and sets the stage for a light crumb.
- Pro Tip: Scrape down the sides of the bowl a couple of times to make sure everything is evenly mixed.
Step 4: Add the Eggs and Vanilla Bean Paste
- Add the eggs one at a time, beating well after each addition.
- Stir in the vanilla bean paste—this is where the magic (and those beautiful vanilla specks) begins!
Step 5: Alternate Adding Dry Ingredients and Buttermilk
- Turn the mixer to low and add the flour mixture in three parts, alternating with the buttermilk in two parts.
- Start and end with the dry ingredients.
- Mix just until combined—don’t overmix!
- Pro Tip: Overmixing can lead to a dense cake. Stop once there are no visible streaks of flour.
Step 6: Pour, Tap, and Bake
- Divide the batter evenly between your prepared pans.
- Gently tap each pan on the counter to release any air bubbles.
- Bake for 28–32 minutes, or until a toothpick inserted in the center comes out clean.
Step 7: Cool Before Removing and Frosting
- Let the cakes cool in the pans for 10 minutes.
- Carefully turn them out onto a wire rack to cool completely before frosting or serving.
Notes
Nutrition Information (Per Serving)
- Calories: 325
- Total Fat: 15g
- Saturated Fat: 9g
- Cholesterol: 75mg
- Sodium: 180mg
- Carbohydrates: 43g
- Fiber: 0.5g
- Sugars: 25g
- Protein: 4g
Nutrition facts are estimates and may vary based on specific ingredients used.
Frequently Asked Questions
Curious about how to get the best results with your vanilla bean cake? Below are some common questions that can help you troubleshoot and perfect your baking skills!
How do you use vanilla bean in cake?
To use a vanilla bean in cake, simply slice the pod lengthwise and scrape out the tiny black seeds inside using the back of a knife. Add those fragrant seeds directly to your batter or wet ingredients. You can also simmer the empty pod in milk or cream to infuse even more flavor before discarding it. This method gives your vanilla bean cake that signature speckled look and deeply aromatic flavor.
Why is it called Depression cake?
Depression cake, also known as “wacky cake” or “war cake,” originated during the Great Depression when ingredients like eggs, milk, and butter were scarce. Instead, the recipe used pantry staples like vinegar, oil, and baking soda to create a surprisingly moist and fluffy cake. While not a vanilla bean cake specifically, the term reflects a creative and resourceful approach to baking—one that still inspires many dairy-free and eggless recipes today.
Can I use vanilla extract instead of vanilla bean paste?
Yes, you can! While vanilla bean paste gives a richer flavor and those beautiful specks of vanilla, pure vanilla extract will still work great. Use 1 tablespoon of vanilla extract in place of the paste.
Can I make this cake ahead of time?
Absolutely! This cake stores well. You can:
Make the cake layers a day in advance: Store them in an airtight container at room temperature or in the fridge.
Freeze the cake: Wrap the cooled layers tightly in plastic wrap and freeze for up to a month. Just be sure to thaw them completely before frosting.
How can I make my cake more moist?
For an extra moist vanilla bean cake, consider adding a couple of tablespoons of sour cream or yogurt to the batter. These ingredients add richness and moisture, ensuring a soft, tender crumb.
What can I use if I don’t have cake flour?
Cake flour gives this cake its soft, fluffy texture, but if you don’t have any, you can substitute it with all-purpose flour. For every cup of all-purpose flour, remove 2 tablespoons and replace with cornstarch. This helps reduce the protein content, making it more cake-like.
Can I add fruit or nuts to the batter?
Yes, adding fruit or nuts is a great way to customize this cake. Try folding in blueberries, chopped strawberries, or toasted almonds for an added crunch and flavor boost. Just be sure not to overmix—gently fold them in to keep the texture light.
How do I make sure the cake layers don’t sink in the middle?
Make sure to measure your baking powder carefully, and don’t open the oven door during the first 20 minutes of baking. This helps prevent temperature fluctuations that can cause the cake to sink. Also, check the doneness early by inserting a toothpick—if it comes out clean, your cake is ready!
I want to adapt this cake to a diabetic friendly version
Tell me if i dont use eggs as a binder what can i use as a substitute ?